
Masks are a wonderful way to discover differences in cultural perspectives, character nuances, and the ideas of subtext and implication. They allow students to dive into the past and see into another’s eyes — literally. For that reason, I highly recommend them as a tool for many teachers in many subjects. But what if you are prohibited from ordering art supplies (and therefore aquaplast)? Well Ta DAA! Enter Manila Folder Masks. Made almost entirely out of Office Supplies!!!
Manila Folder Mask: What is it?
Believe it or not, Manila Folders have different properties than any other paper product, including card stock and oak tag, which they resemble. They are more pliable, more resilient, and more durable, and can take and hold more shapes than any other paper product. I STRONGLY recommend experimenting with this marvelous stuff, and really listen to what it is telling you. Make curls, make cupped leaves, or make bridges. This will give you the building blocks to create your finished product.
What are the pros and cons of Manila Folder Masks?
Pros
- So many teachers cannot order “art supplies.” Luckily, these are OFFICE supplies. Plus, they are very cheap!
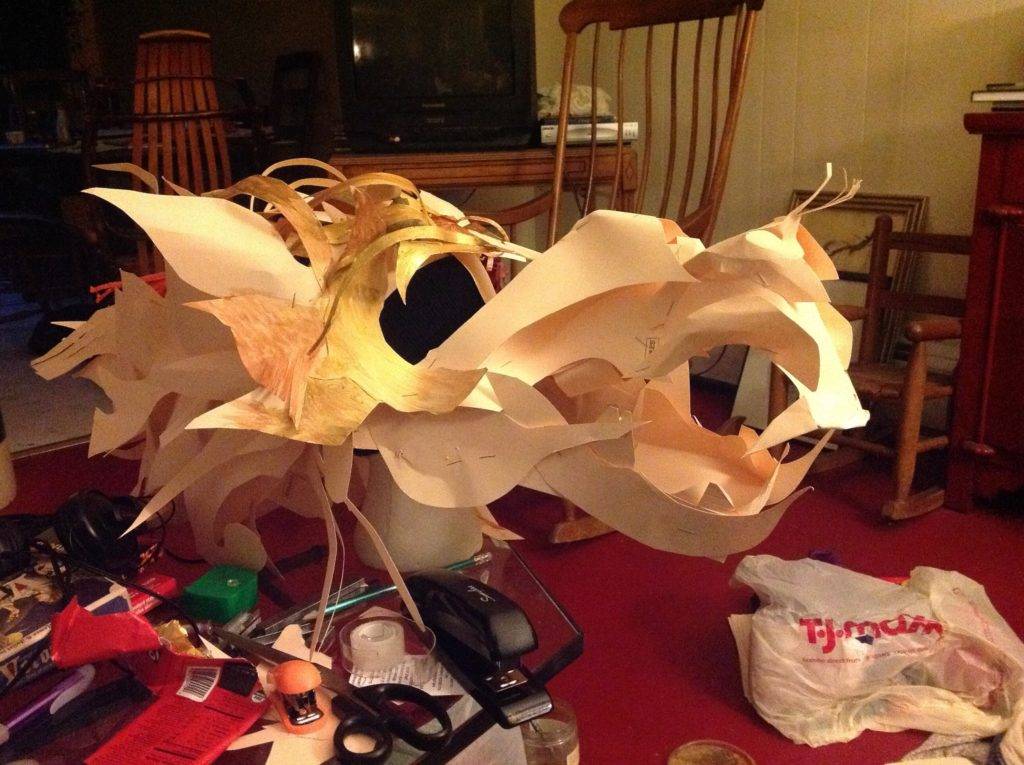
- You can make them REALLY BIG (I made a 3.5 foot-long dragon’s head complete with hinged jaw with folders, staples, and brass paper fasteners)!
- You can do it without any liquids, and the “waste” materials are all recyclable!
- Materials do not need to be new — used works fine.
- Manila folders are stronger and longer-lasting than papier mache.
- Anyone can do it. Children as young as 4 and as young as 84 have had delightful experiences making manila folder masks.
Cons
- Manila folders are an intriguing material. No matter what you do, it will be really cool. However, to be able to create what you want in any intricate way, you really have to get to know the material, listen to it, watch it behave, learn it. I personally think this is a “Pro” not a “Con,” but it takes time.
- Repeated sweat will “eat through” the head band — so you should put packing tape on the inside. Which, of course, means that it becomes cleanable. How cool is that?!?!?
Here’s how to make Manila Folder Masks
Stage One: “Sculpting” the form
There are several basic models from which to “grow” a manila-folder mask. I will outline the form that is simplest. In this case, the “form” is a supported shape of your head. First, create a band that snugly fits your head. You will need strips from the length and width of your manila folder to make one long enough to go around — make it about an inch or 1.5 inches wide. NOTE: When you staple the two pieces together, make sure the “head” of the staple is on the inside and the “feet” are on the outside, so the staples do not get caught in your hair or scratch your face. This is a general rule for this project.
After you have made the snug band, you need to create at least 2 cross braces over the top. I recommend making them run diagonally rather than perpendicularly; strength comes from mixing diagonals with right angles, and you’ll want the right angles for your hair, ears, and horns. NOTE: It’s best NOT to trim the braces. Make them toooo long on purpose so you have an uncut strip to which you may attach other facial structures. Joints are the weakest spots, so we want to keep them to a minimum.
Stage Two: Building the Mask
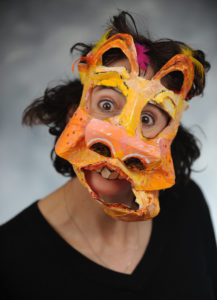
At this stage, it is important to know what you are aiming for. Are you 6 years old and making a bird with a 4 inch beak? Are you an adult artist making a 2 foot long monster mask? In order to build the support frame and portions of the face, you need to know how big it’s supposed to be. Wait—what? PORTIONS of the face?!?! YEP! Part of makes Manila folder masks so groovy is that you don’t need the whole outer part to be solid. The masks look awesome with spaces and they also look awesome with a “skin” of light fabric, gauze, tissue paper, even toilet paper (tissue and toilet paper should be brushed with modge podge).
To build a support for your bird beak or giant monster face, use long slender strips with cross braces, tabs, folds, or curls as supports. Remember to connect strips at diagonals and right angles for maximum strength.
For cheeks, chins, ears, brows and so on, cut out trapezoids, teardrop shapes, fat rainbows, and experiment with bending them to make a box or “canoe” with tabs, pressing them into your palm to make a “cup” with extra on the bottom for stapling, and so on. Folders LOVE to hold these shapes! Make them slightly larger than you need or with a tab or tail for attaching.
Go ahead and try something! Remember that all masks want to be super 3D. Add horns, hair, squiggles, nostrils — go crazy! One classroom of 4th graders with which I worked struggled with their first “test drive” mask. They then absolutely fell in love with the stuff, and made masks for their play based on First Nations Tales, then made masks just for themselves! They loved it so much they gave up computer time!!!
Stage Three: Finishing up
Inside: I would put a light layer of modge podge (which functions differently than either glue or wallpaper paste) for strength and rigidity. You may need to put some packing tape on the inside to protect the mask from your sweat or to cover up the staple feet that you did on the inside by accident.
Outside: For a crisper hold, use modge podge. One neat trick is to draw on the manila folder pieces with magic marker (MUCH better than soggy paint!) then put modge podge on (immediately for a more paint-like look, after a moment for a harder line look). Lay colored tissue paper over the markered area. Voila! It looks AWESOME through the tissue paper. To make the colored tissue paper even more translucent, put a light coat of modge podge on the outside of the tissue paper as well, once the underneath coating has dried. I strongly recommend experimenting on scraps first!